Are you new to photography or struggling to attach your Canon DSLR camera to a tripod? No need to worry! Learning how to properly attach your camera to a tripod is a crucial step in capturing steady and sharp photographs.
In this article, I’ll provide you with simple and easy-to-follow steps on how to attach your Canon DSLR camera to a tripod. Whether you’re a beginner or a professional photographer, these tips will help ensure that your camera is securely attached and ready to take stunning photos.
Table of Contents
Preparation
Before you attach your Canon DSLR camera to the tripod, take some steps to make sure it’s set up correctly.
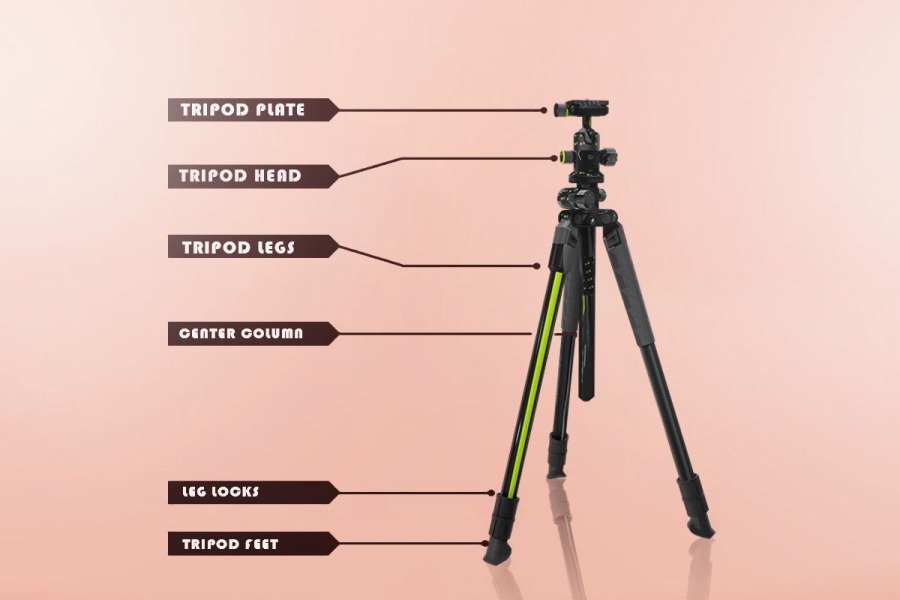
First, make sure you have all the components you need. This includes: the Canon DSLR camera, a tripod, a camera plate, and the tools for attaching them.
Then, you can start connecting all the pieces together.
Gather the necessary materials
Gather your camera, lens and a tripod. Ensure the tripod is suitable for your camera or lens. When you have them all ready, it’ll be easy to attach them together.
Familiarize yourself with the camera and tripod
As a photographer, learn to attach your Canon DSLR camera to a tripod securely and safely. Take time to understand the features of your tripod. Check the size of the legs- look at their diameter and extension length. See what kind of plate is compatible with your tripod base head.
Adjust each leg joint of the tripod. Make sure that the screws don’t become too loose. Check for any other adjustments available. Turn off your camera before attaching it. Attach the correct type of plate or attachment to the base of your DSLR Camera. Tighten slightly but firmly- do not overtighten.
Securely attach your camera onto the tripod head. Lock it in place using the lever/knob adjustment at its base. You are now ready to use it safely!
Attaching the Camera
Capturing the perfect photo? Essential to have a great setting. For stability and no motion blur? Use a tripod! This article will show you how to attach a Canon DSLR camera to it. Super simple! Here we go.
Unscrew the quick-release plate
Before attaching your Canon DSLR camera to a tripod, make sure the quick-release plate is fit firmly. Unscrew the two screws. Slide the plate into the tripod socket. Tighten it with the same two screws. Ensure they are both tight so your camera is secure.
Then, you can attach your Canon DSLR camera to the tripod.
Secure the plate to the camera
Attach the tripod leg to the camera head. Next, secure your DSLR camera to the tripod. Use a quick-release plate. Make sure it fits snugly into the tripod head mount and tighten it with a screwdriver. If you don’t have a plate, buy one that is compatible with your brand of DSLR. The plate must be held firmly on the DSLR base or on top. Check your camera manual if you are unsure.
After connecting the plate, adjust horizons for amazing shots!
Attach the camera to the tripod
To get your Canon DSLR Camera ready to take amazing photos, you must attach it to the tripod. Here are the basics:
Take off the lens cap. Connect the camera base plate to the tripod base. Both plates should be marked with letters. ‘A’ is for the plate, ‘B’ is for the tripod base plate. Tighten the connection of both plates with an extra screw.
After that, mount the lens onto the camera. Make sure all ports align and lock on securely. You may need to apply more pressure, depending on the lens. When everything is secure, adjust your camera. Change the height and angle until you’re happy. Also adjust any shooting settings, like shutter speed and ISO. Lastly, connect cables, if needed (like the external flash card slot). You can now start shooting!
Adjusting the Settings
Secure your DSLR camera to a tripod for sharp captures. To optimize your camera for the best shots, some adjustments are required.
This article’s aim is to explain how to make these alterations.

Adjust the tripod head
To attach my Canon DSLR to a tripod, I need to adjust the tripod head. It varies, depending on the camera and tripod type. For a ball head, I loosen the large knob on its side and put my camera on top. Then, I tighten the knob, just enough so the camera won’t slide off but not too much that I can’t rotate it or change elevation.
I can also attach my Canon DSLR to a pan-and-tilt head, a three-way head, or an axis tilting device if my tripod has one. For best results, I check the specs of the tripod to see what type of mount is compatible.
Adjust the camera settings
To attach your Canon DSLR to a tripod, start by adjusting the settings. Many photographers like to keep the ISO low for best image quality – 100 or 200 is a good place to start. Set your aperture and shutter speed according to your creative goals. White balance and other image settings can make a difference. Experiment with different setups to get the best results. Modern cameras have helpful tools such as HDR and AutoFocus.
When you’re done setting up, attach the camera’s body securely and safely onto the tripod.
Secure the camera to the tripod
Loosen the center column lever on top of the tripod or the ratchet arms on the legs. Twist open the mounting screw lamp on your camera halfway. Attach the half-screwed lamp to the mounting plate on the center column or mini-ball head. Make sure they are connected tightly. Then, twist clockwise until they click into place firmly. Adjust any additional knobs and levers. Check that everything is aligned and secured. Now, you’re ready for photography!
Final Steps
You have picked a tripod for your Canon DSLR camera? Excellent!
Now, make sure the tripod is steady. Also, you’ll need to get the right mounting plate and attach it to the camera.
Follow these steps and you’ll be all set to take awesome pics!
Check the stability of the camera
My DSLR camera is now mounted on the tripod. It’s essential to check if it’s fixed firmly. Make sure the screws and clamps are not loose. Especially, lock the quick-release plate onto the base plate. Additionally, screw all the three legs of the tripod. Make sure none of them slides out.
Test its stability. Wiggle each leg slightly and press down gently. If it’s stable, then I’m ready to take photos!
Take test shots
Time to test out your camera on the tripod. Adjust the ball head tension for smooth movement. Check settings and take sample shots. Frame the shot horizontally or vertically. Play around with different settings. Stand back and check all elements in place. Once you’re confident, start shooting for real!
Enjoy your photography!
Your Canon DSLR camera is now set up and attached to its tripod! Perfect for taking beautiful photos. Make sure to adjust the tripod height and orientation for the best viewfinder framing.
Practice makes perfect! Experiment with different frames, angles, lighting setups and exposure settings. Explore the world around you with your trusty tripod-mounted camera.
Photography isn’t just about capturing stunning visuals – it’s also about having fun! Learn something new with each photo you take. Enjoy the memories each time you press the shutter button. Happy Shooting!
